Modding:Referencia IDE

|
Traducción incompleta Este artículo o sección no ha sido completamente traducido al español.
Le invitamos a ayudar en su construcción editándolo |
Esta página es una referencia rápida de cómo usar Visual Studio 2017 o MonoDevelop/Visual Studio para Mac al crear o editar un mod SMAPI. Ve a Modding:Modder Guide para la guía principal.
Antes de comenzar
- Debes instalar Visual Studio Community (Windows), o Visual Studio for Mac (Mac).
- Si estás en Linux, deberás usar VisualStudio en una máquina virtual, o una versión EAP de Rider. (Anteriormente se usaba MonoDevelop para Linux, pero ya no funciona.)
- Se recomienda revisar Conceptos básicos de C# para principiantes si C# es nuevo para ti.
- Estos son algunos términos que recordar:
term definition IDE El programa usado para editar, correr, y compilar tu código (abreviación de Integrated Development Environment en inglés, o Entorno de Desarrollo Integrado ). Las IDEs principales son Visual Studio en Windows, y MonoDevelop/Visual Studio para Linux o Mac. DLL El archivo con extensión .dll que contiene tu código (abreviación de Dynamic Link Library en inglés, o Biblioteca de enlace dinámico). Este es el archivo que SMAPI lee al cargar tu mod. proyecto Colección de codigo fuente + configuración + recursos (como imágenes) que editas en la IDE. Cada proyecto es compilado en su propio DLL. solución Un conjunto de proyectos con una configuración global. La solución no es compilada, pero tiene características convenientes (como dejar que los proyectos hagan referencia a otros).
Crea un proyecto de mod
Antes de escribir tu código, debes crear una solución y proyecto que lo contenga.
Windows (Visual Studio 2019/2022)
- Abre Visual Studio 2019/2022.
- Seleccionar Crear un proyecto en la pantalla de inicio.
_ES.png)
- Filtra por "C#" y "Librería", luego escoge Biblioteca de clase y haz click en Siguiente. Asegúrate de no escoger Biblioteca de clase (.NET Framework), porque esa no funcionará.

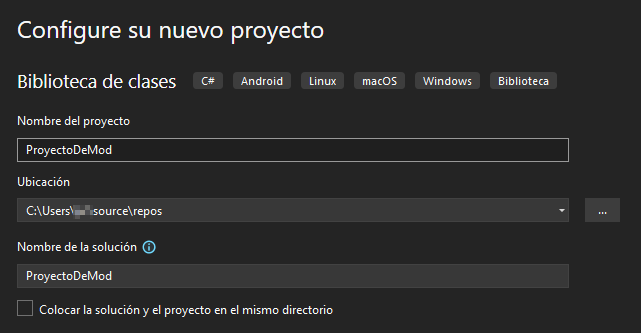
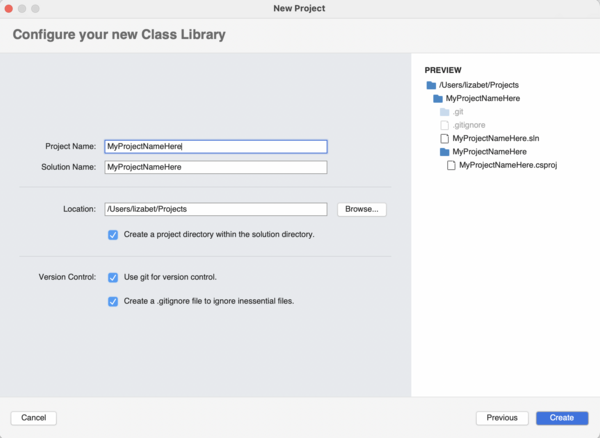
- En la pantalla de configurar proyecto:
- Ingresa un nombre de mod descriptivo. Como regla, el nombre debe ser una palabra con capitalización (como "ManzanasPorDoquier").
- Asegúrate de que "Colocar solución y proyecto en el mismo directorio" no esté activado.
- Haz click en "Crear" para crear el proyecto.
- Luego, selecciona NET 6.0 y haz click en "Crear" para crear el proyecto. En VS 2022, esto estará en la página siguiente.
_ES.png)
_ES.png)

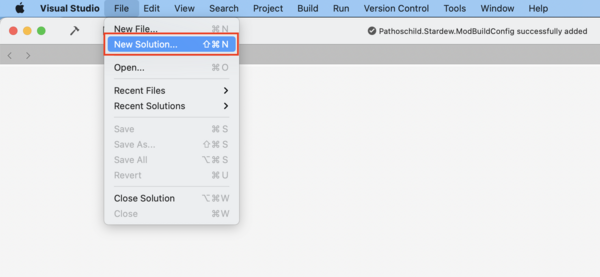
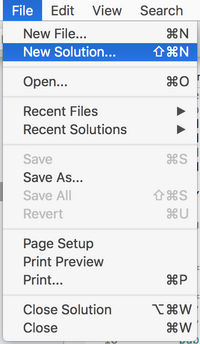
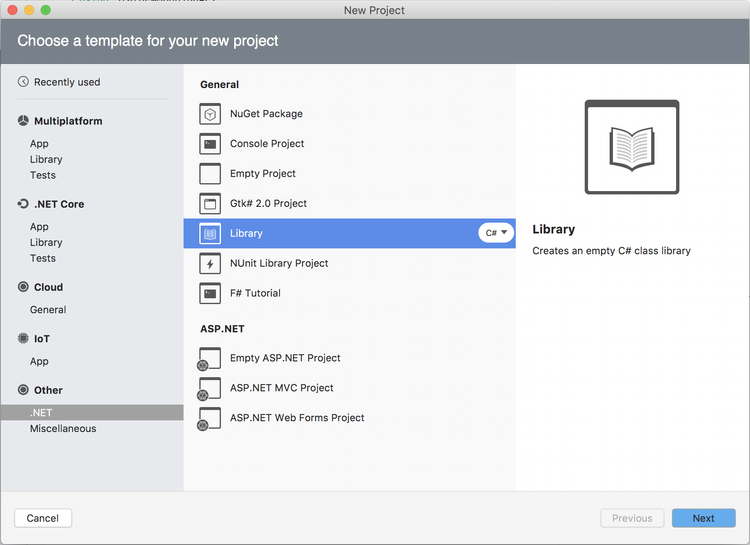
Linux (Rider)
- Instala la SDK de .NET 6.0 si no lo has hecho (link).
- Abre Rider.
- Haz click en New Solution desde la barra de menú (derecha superior):
_ES.png)
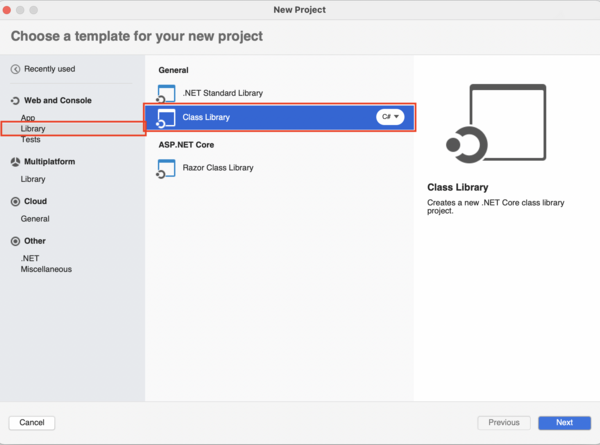
- En la ventana de proyecto, haz click en Class Library:
_ES.png)
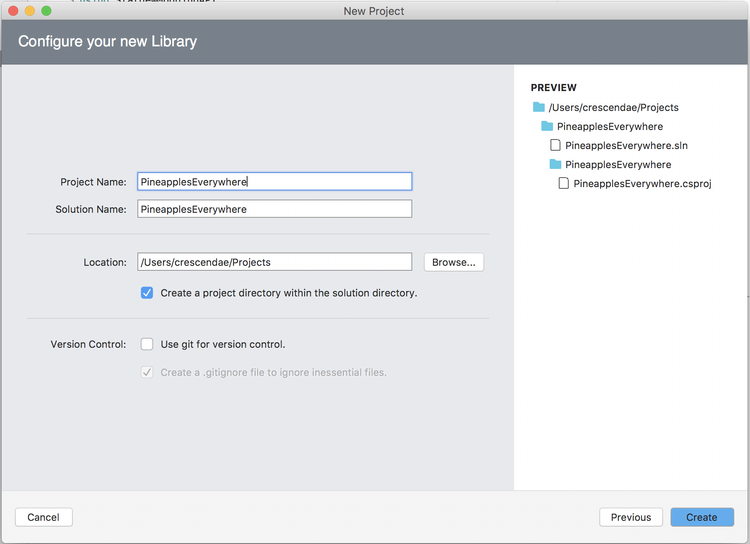
- Ingresa un nombre de mod descriptivo. Como regla, el nombre debe ser una palabra con capitalización (como "ManzanasPorDoquier"):
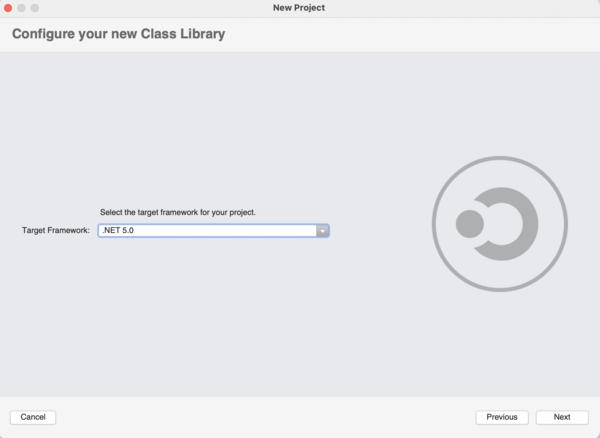
- Asegúrate de que "Target framework" sea net6.0, y "Language" sea C#:
_ES.png)
MacOS (Visual Studio 2019 for Mac)
- Instala la SDK de .NET 6.0 si no lo has hecho (link).

- Abre Visual Studio para Mac.
- Haz click en Archivo » New Solution from the menu bar:
- Select the correct type of class library:
- Set it to target .NET 5.0.:
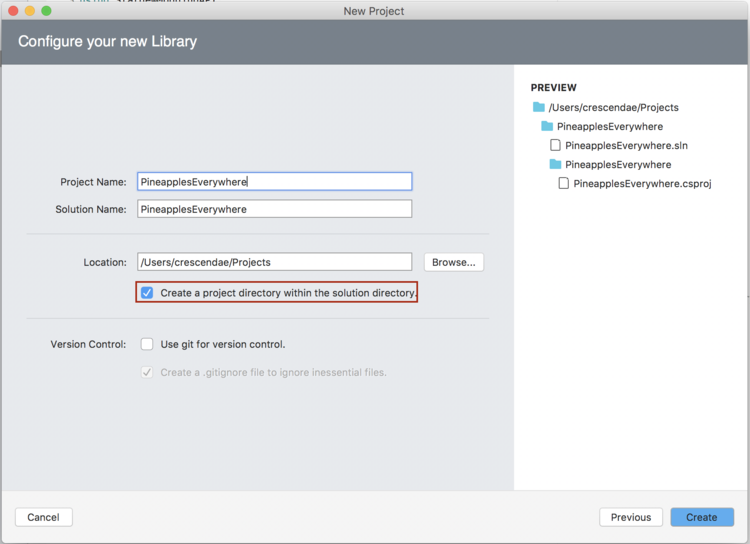
- Enter a descriptive mod name for the project. By convention, the name should be one word with mixed caps (like "PineapplesEverywhere"):


MacOS (Visual Studio for Mac)
- Open Visual Studio for Mac.
- Click File » New Solution from the menu bar:
- In the 'New Project' window, choose .NET » Library and click Next:
- Enter a descriptive mod name. By convention, the name should be one word with mixed caps (like "PineapplesEverywhere"):
- Make sure "create a project directory within the solution directory" is checked, and click Create:
.png)
.png)
.png)
.png)
Selecciona la fuente de trabajo
La 'target framework' (fuente de trabajo) es la versión de .NET que tu código usa, lo que afecta la versión necesitada para usar tu mod. Se recomienda .NET 6.0, que es la versión que SMAPI usa en 1.6. Por favor revisa la versión de tu sistema operativo (Windows/Mac).
In Windows Visual Studio 2022
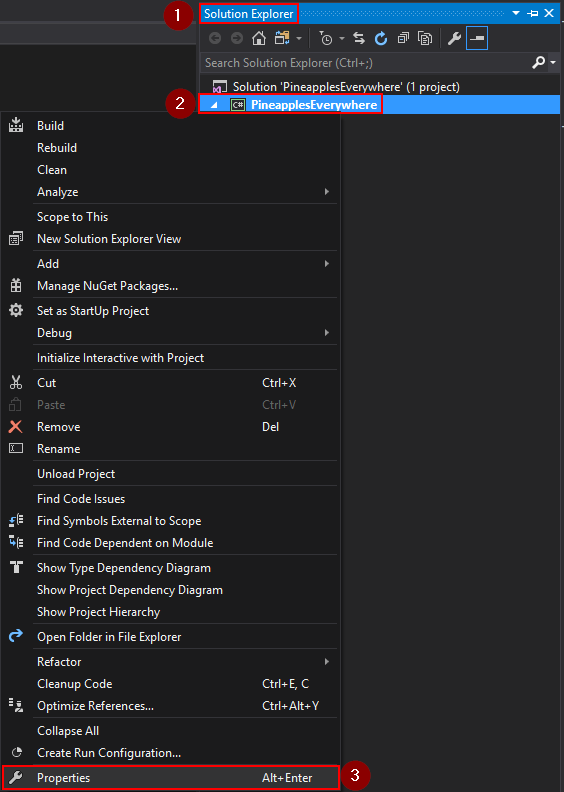
- Open the Solution Explorer pane. If it's not visible, click View » Solution Explorer from the menu:

- From the Solution Explorer, right-click on the project and choose Properties:
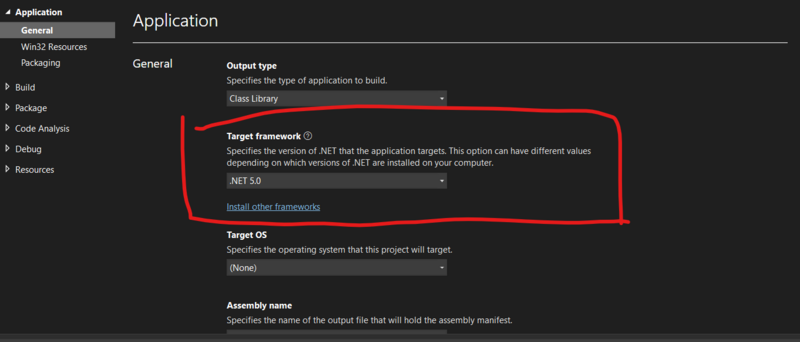
- On the Application tab, change the Target Framework dropdown to .NET 5.0:
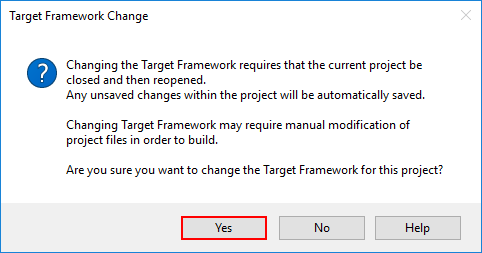
- A dialogue may appear asking you to confirm the change. Click 'Yes' to confirm:
.png)
.png)
.png)
.png)
In Visual Studio 2019 for Mac
If you followed the instructions above to set up your project, your framework should already be set to .NET 5.0. However, if you picked the wrong class library or you just want to check, you can follow these steps to look at the .csproj file, which is basically equivalent to setting it manually. (If you're checking that it worked, don't replace the .csproj, just check it refers to .NET 5.0.)
Unfortunately there doesn't appear to be a way to change the target framework using the GUI. However, it is very easy to follow the 1.5.5 migration guide steps:
- Open the .csproj file for editing:
- Replace your mod's .csproj file with this (where
EXAMLE_MOD_NAMEis your solution's name):

<Project Sdk="Microsoft.NET.Sdk">
  <PropertyGroup>
    <AssemblyName>EXAMPLE_MOD_NAME</AssemblyName>
    <RootNamespace>EXAMPLE_MOD_NAME</RootNamespace>
    <Version>1.0.0</Version>
    <TargetFramework>net5.0</TargetFramework>
  </PropertyGroup>

  <ItemGroup>
    <PackageReference Include="Pathoschild.Stardew.ModBuildConfig" Version="4.0.0" />
  </ItemGroup>
</Project>
- If the mod uses Harmony, add
<EnableHarmony>true</EnableHarmony>to the property group.
In MonoDevelop/Visual Studio for Mac
This section is out of date for Stardew Valley 1.5.5. It appears you cannot change the .NET framework in this way with Visual Studio 2019 and Stardew Valley 1.5.5.
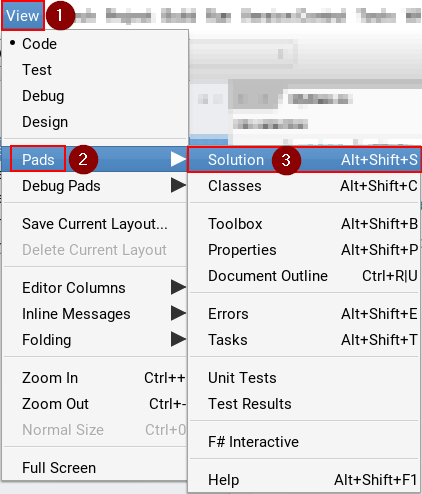
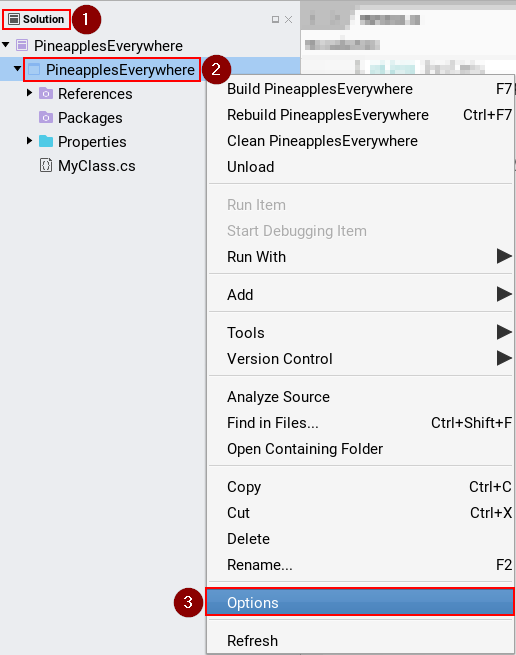
- Open the Solution pad. If it's not visible, click View » Pads » Solution from the menu:
- From the Solution pad, right-click on the project and choose Options:
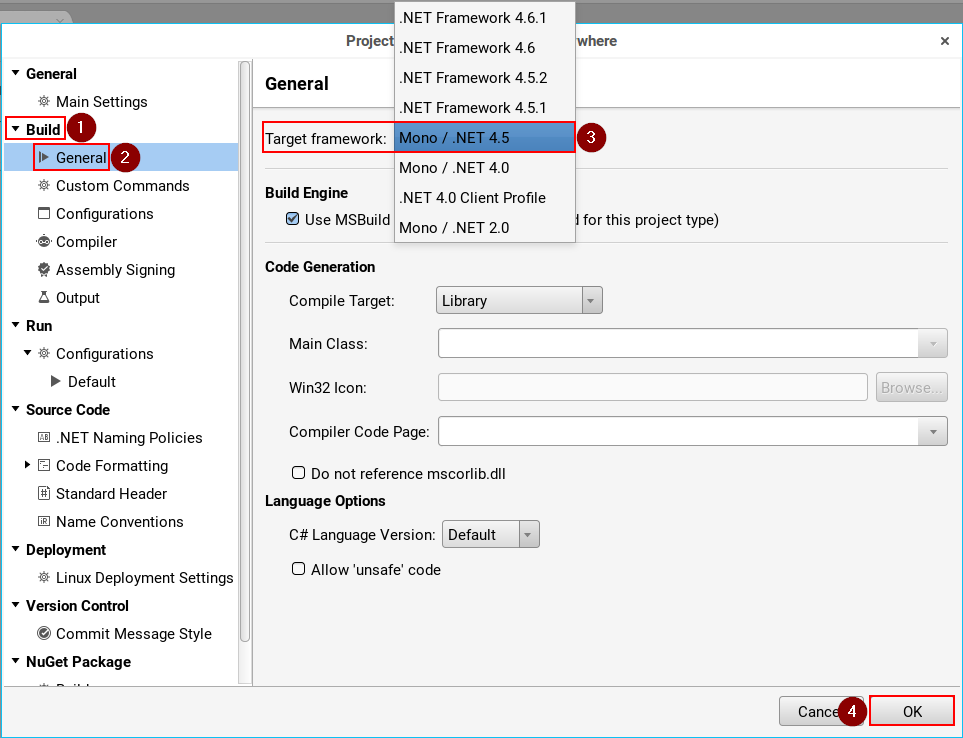
- On the Build » General tab, change the Target Framework dropdown to Mono / .NET 4.5:
.png)
.png)
.png)
Add a file
In Visual Studio 2017
- Open the Solution Explorer pane. If it's not visible, click View » Solution Explorer from the menu:
- From the Solution Explorer pane, right-click on the project and choose Add » New Item:
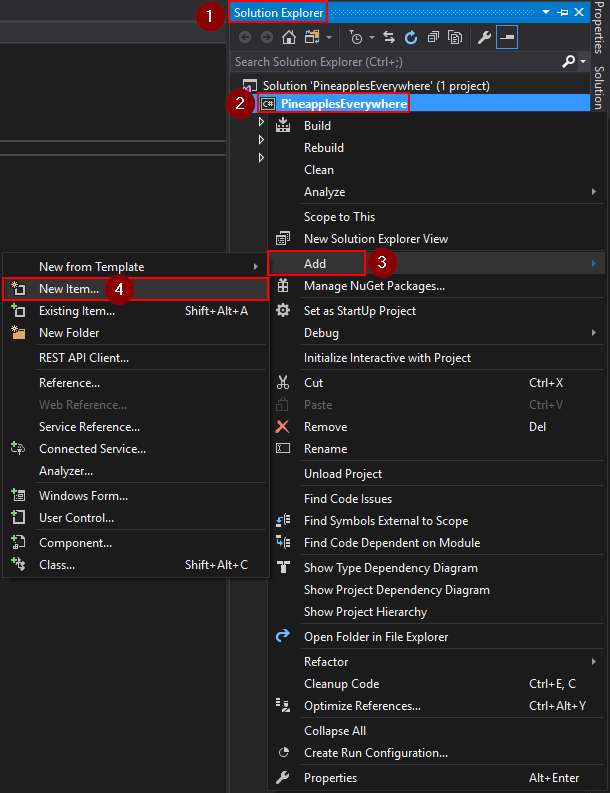
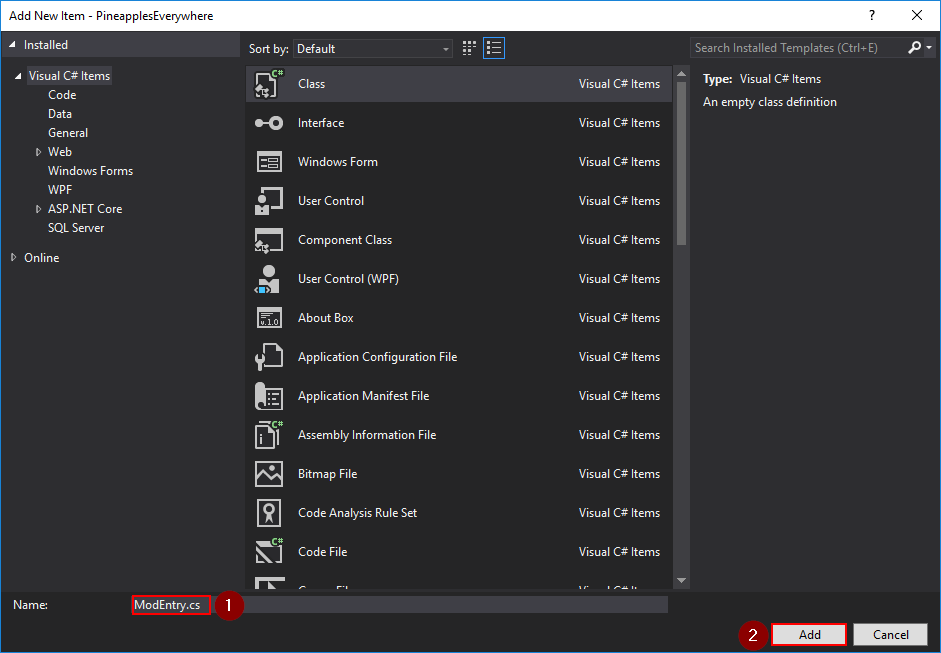
- From the 'Add New Item' window, choose the file type (usually Visual C# Item » Class):
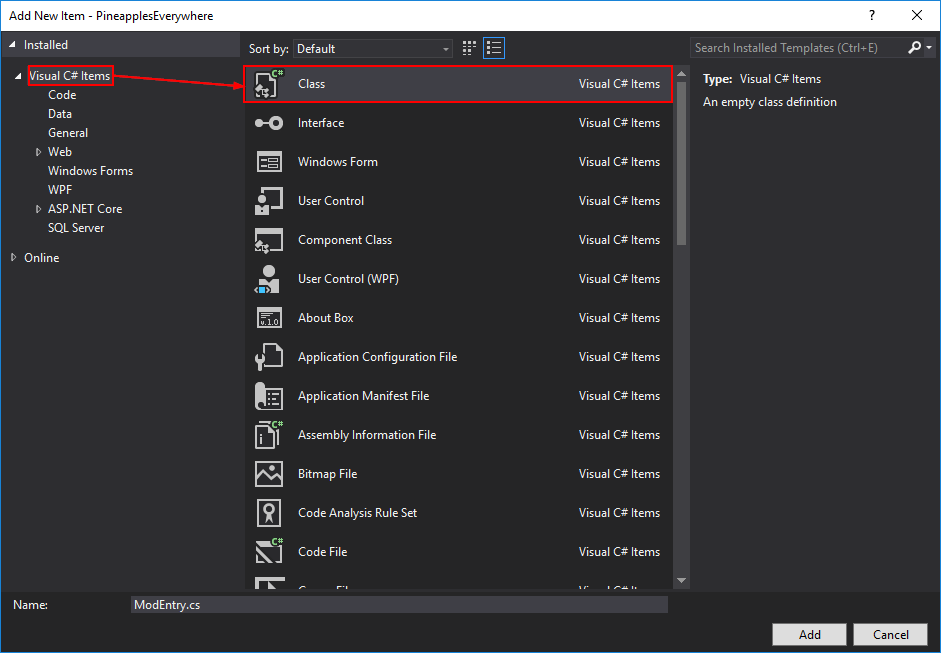
- Enter a descriptive file name and click Add:
.png)
.png)
.png)
In MonoDevelop/Visual Studio for Mac
- Open the Solution pad. If it's not visible, click View » Pads » Solution from the menu:
- From the Solution pad, right-click on the project to delete and choose Add » New File:
- From the 'New File' window, choose the file type (usually General » Empty Class):
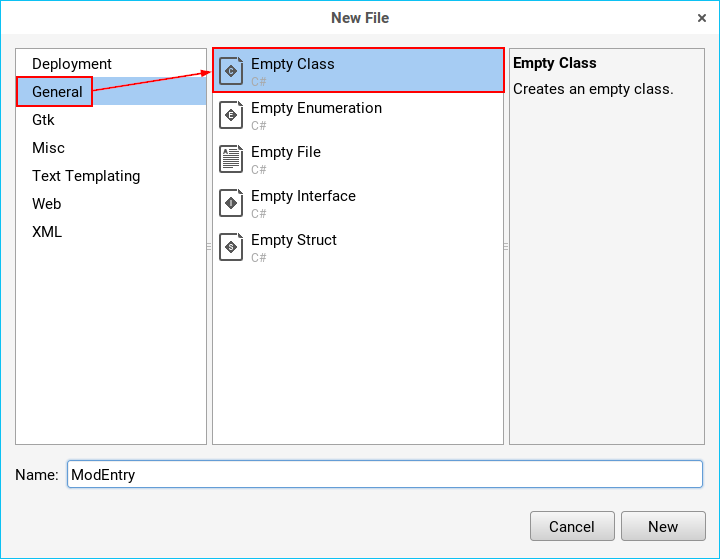
- Enter a descriptive file name and click New:

.png)
.png)
.png)
Delete a file
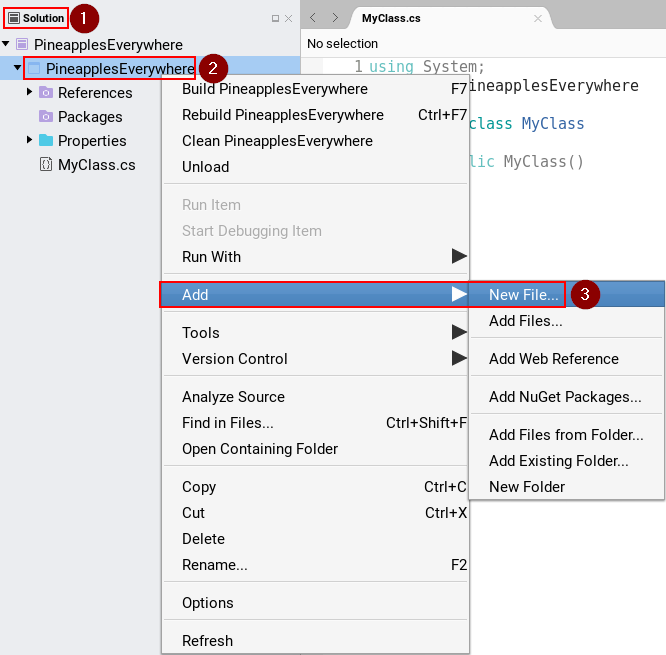
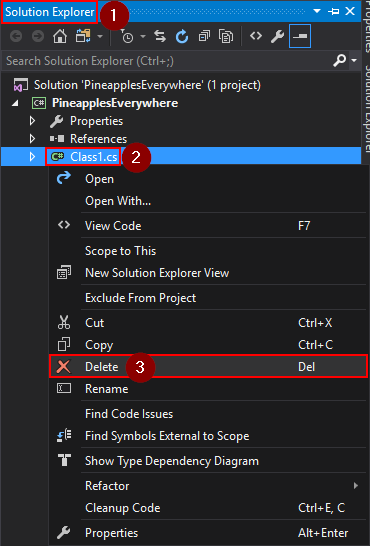
In Visual Studio 2017
- Open the Solution Explorer pane. If it's not visible, click View » Solution Explorer from the menu:
- From the Solution Explorer pane, right-click on the file to delete and choose Delete:
.png)
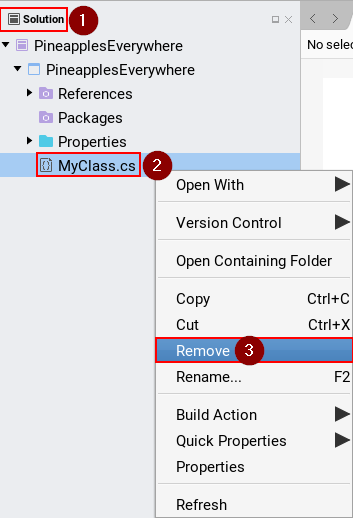
In MonoDevelop/Visual Studio for Mac
- Open the Solution pad. If it's not visible, click View » Pads » Solution from the menu:
- From the Solution pad, right-click on the file to delete and choose Remove:
.png)
Add a NuGet package
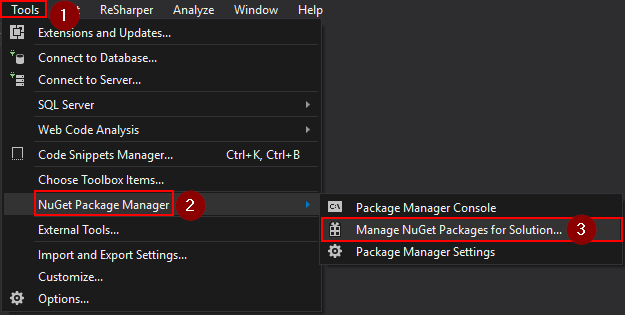
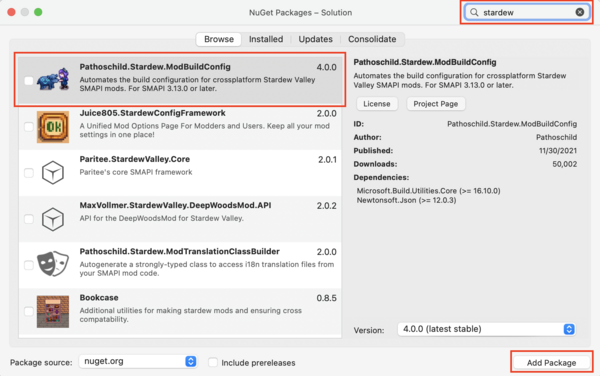
In Visual Studio 2019/2022
- Click Tools » NuGet Package Manager » Manage NuGet Packages for Solution from the menu:
- Note: if the nuget package manager is missing, you can add it as a package source with the following steps: https://stackoverflow.com/questions/37293242/nuget-package-manager-no-packages-found-even-though-the-package-exists
- On the Browse tab, search for the package and click on the result to display some options:
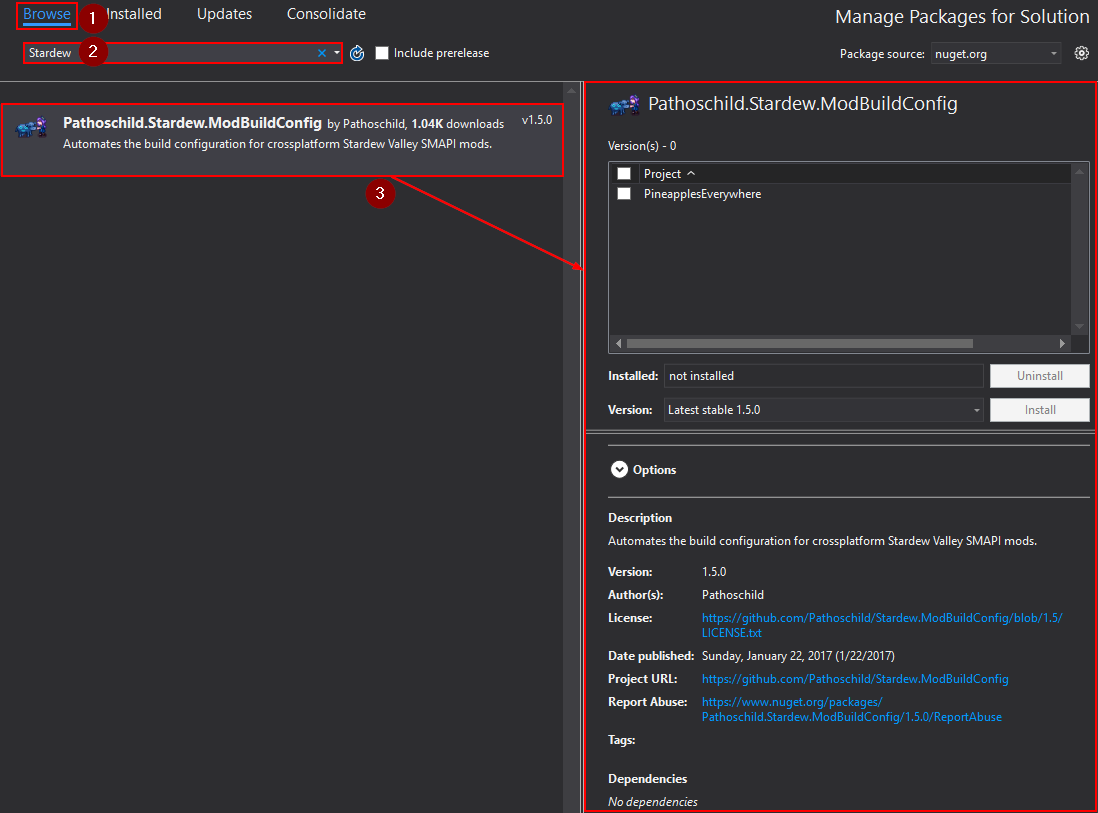
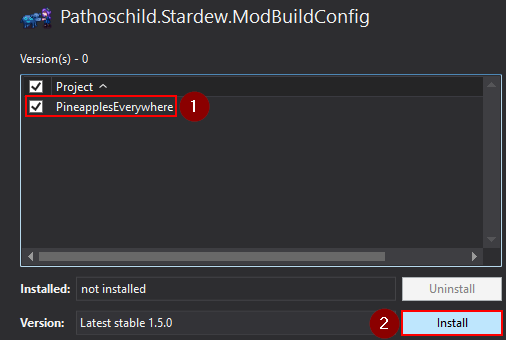
- In the options, check the box next to your project and click Install:
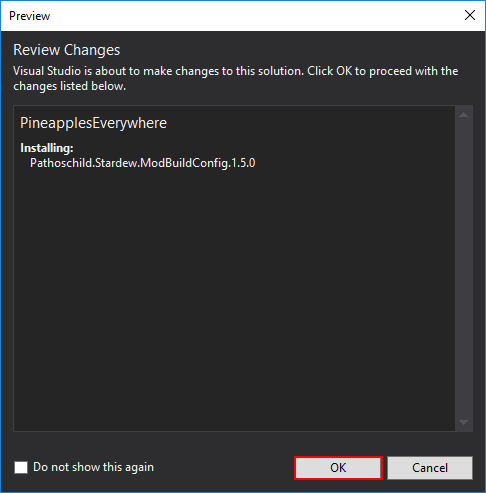
- If a 'Review Changes' dialogue appears, click OK:
.png)
.png)
.png)
.png)
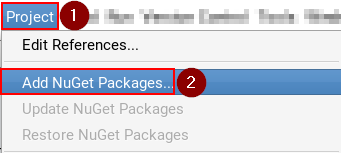
In Visual Studio 2019 for Mac
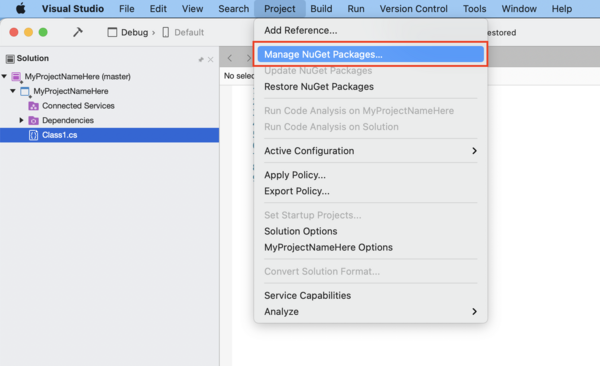
- Click Project » Manage NuGet Packages... from the menu:
- Search for the package, click on the result, and click Add Package:
- Quit and relaunch Visual Studio.


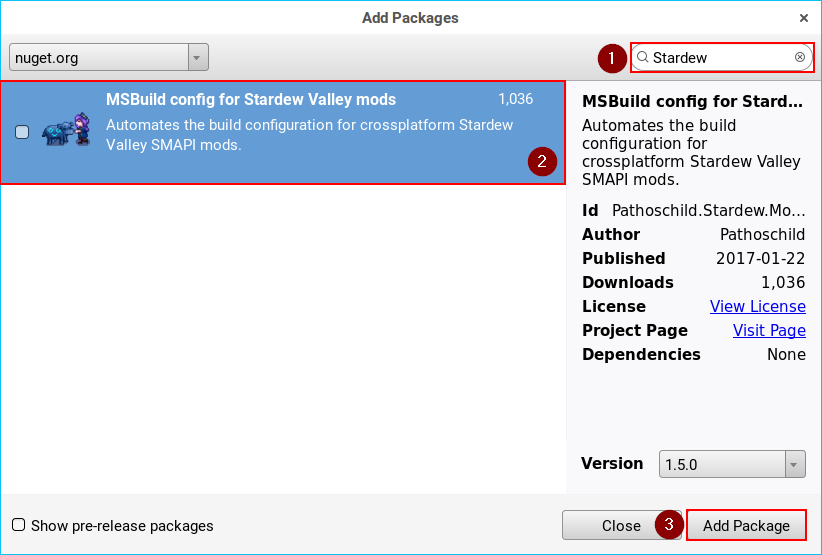
In MonoDevelop/Visual Studio for Mac
- Click Project » Add NuGet Packages from the menu:
- Search for the package, click on the result, and click Add Package:
.png)
.png)
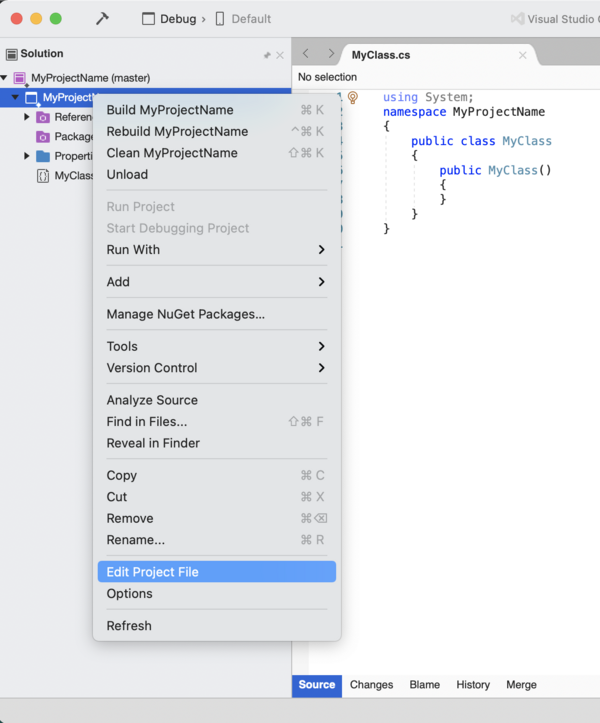
Edit project file (.csproj)
Sometimes you may want to edit the project file directly (mainly to configure build steps). The project is a .csproj file, and can be edited from within the IDE.
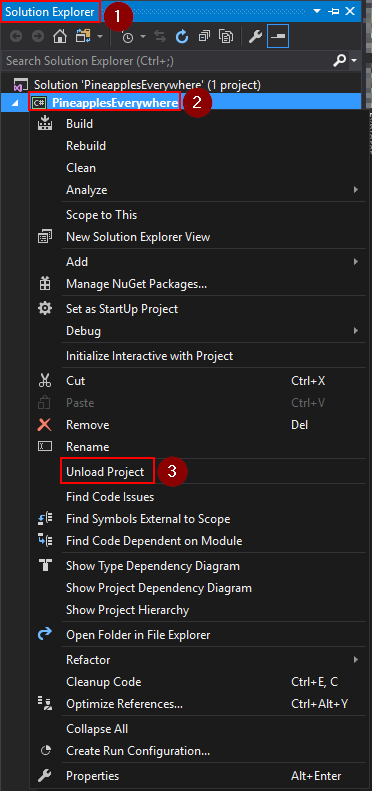
In Visual Studio 2017
- Open the Solution Explorer pane. If it's not visible, click View » Solution Explorer from the menu:
- From the Solution Explorer pane, right-click on the project and choose Unload:
- Right-click on the project again and choose Edit <project name>.csproj:
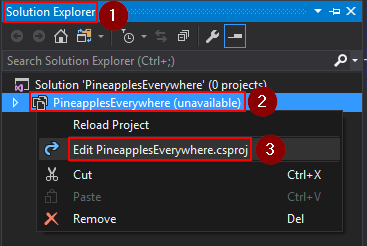
- Make your changes in the editor that appears and save.
- When you're done, right-click on the project again and choose Reload Project:

.png)
.png)
.png)
In MonoDevelop/Visual Studio for Mac
- Open the Solution pad. If it's not visible, click View » Pads » Solution from the menu:
- From the Solution pad, right-click on the project and choose Tools » Edit File:
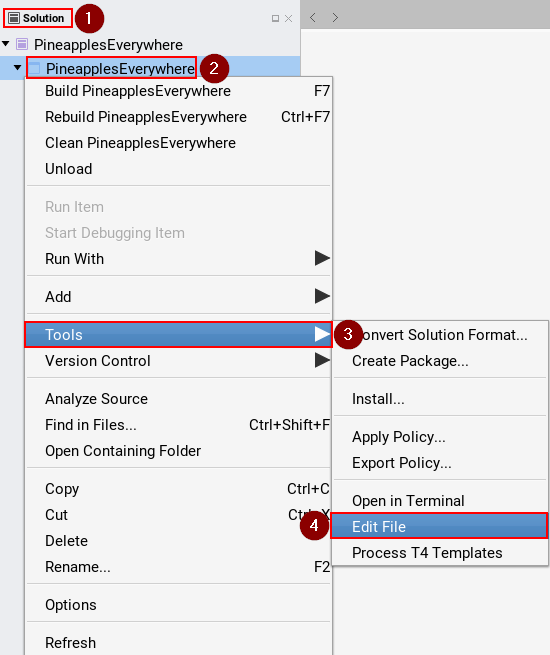
- Make your changes in the editor that appears and save.
.png)
Find compiled files
In Visual Studio 2017
- Open the Solution Explorer pane. If it's not visible, click View » Solution Explorer from the menu:
- From the Solution Explorer pane, right-click on the project and choose Open Folder in File Explorer:
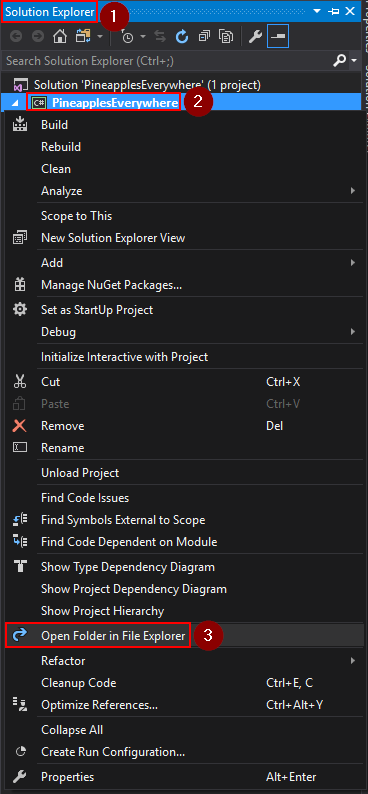
- Navigate to bin\Debug (or bin\Release if you switched to release build configuration).
.png)
In MonoDevelop/Visual Studio for Mac
- Open the Solution pad. If it's not visible, click View » Pads » Solution from the menu:
- From the Solution pad, right-click on the project and choose Open Containing Folder:
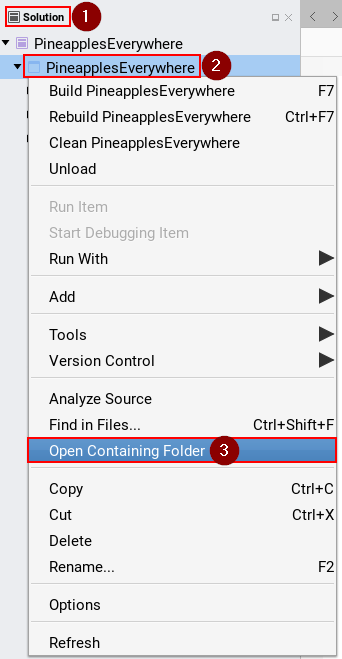
- Navigate to bin/Debug (or bin/Release if you switched to release build configuration).
.png)
Add a reference to another DLL
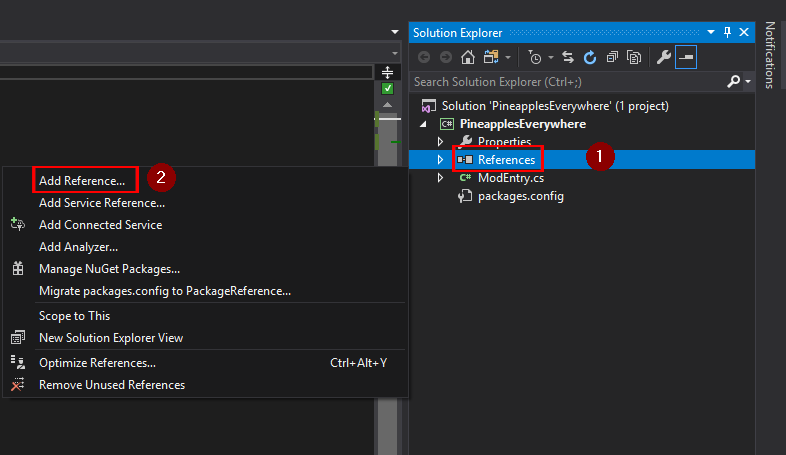
In Visual Studio 2017
- Open the Solution Explorer pane. If it's not visible, click View » Solution Explorer from the menu:
- From the Solution Explorer pane, right-click on References and choose Add Reference...:
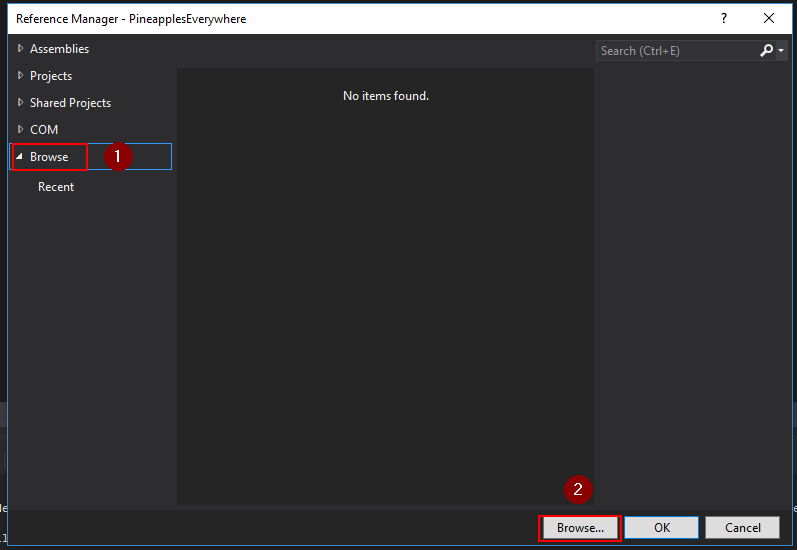
- From the 'Reference Manager' window, choose Browse in the left side, then click Browse.. at the bottom:
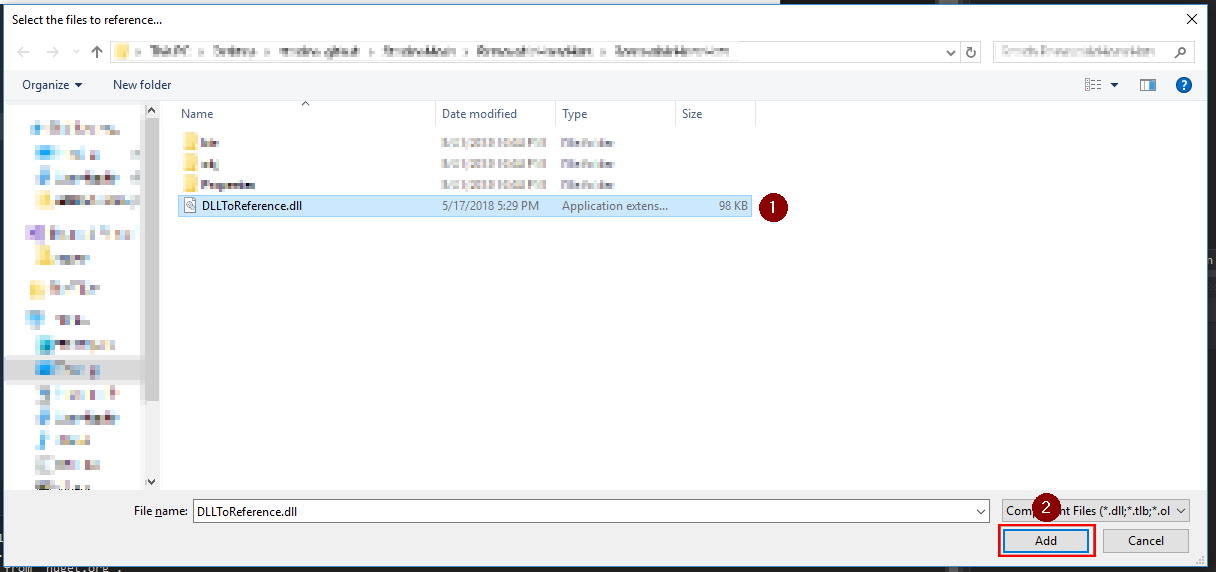
- Find the DLL you want to reference, select it, and click Add:
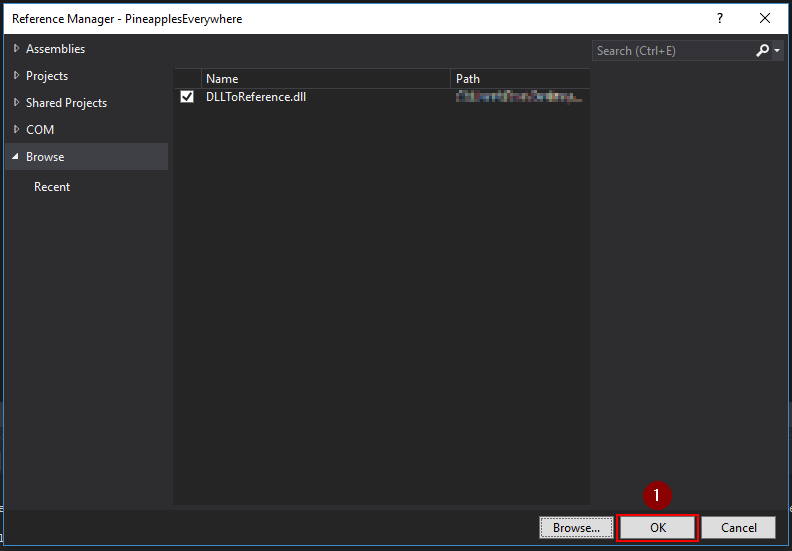
- From the 'Reference Manager' window, click OK:
.png)
.png)
.png)
.png)